~ 6 min read
Advanced usage patterns for taking page element screenshots with Playwright
Using Playwright to take screenshots is a handy tool, whether you are practicing visual regression testing or crawling a 3rd-party webpage to take a screenshot.
However, what if you needed to customize the screenshot, such as remove items in an element that are part of the screenshot? depending on the page structure, you might not be able to exclude the items as they are part of the parent element.
In this post, I will show you some advanced usage patterns for working with Playwright in order to take a screenshot of a specific element and modify the contents of the image, either before taking the screenshot or after, using image preprocessing tools.
We’ll learn and use Playwright, and Sharp to do so.
Let’s get started with programatically taking screenshots!
Taking screenshots with Playwright testing framework
The Playwright documentation is pretty well built to communicate and explain how to take screenshots of a page. It’s as simple as the following API call:
await page.screenshot({ path: 'screenshot.png' });The documentation even covers how to specifically take a screenshot of a specific element, such as:
await page.locator('.header').screenshot({ path: 'screenshot.png' });So let’s take this knowledge and apply it to a real-world example.
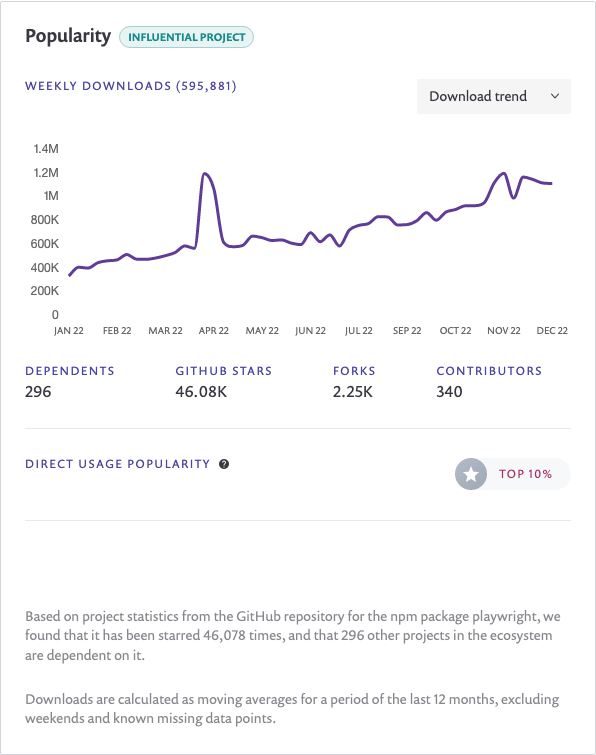
Consider the following Snyk Advisor web page for the Playwright package:

We want to capture a screenshot for the Popularity section, denoted by the (1) annotation in the picture above.
However, we don’t want to capture the three text paragraphs denoted by the (2) annotations. Yet, from an HTML DOM structure perspective, these are part of the parent element, so we can’t just exclude them from the screenshot.
Consider the following test case that uses Playwright to take a screenshot of the Popularity section:
import { test, expect } from '@playwright/test';

test('take screenshot of element', async ({ page }) => {

  await page.goto('https://snyk.io/advisor/npm-package/playwright');

  // run some sanity to make sure we're capturing the right page
  await expect(page).toHaveTitle(/playwright/ig);

  const element = await page.locator('#popularity');
  await element.screenshot({ path: 'package-popularity.png' });
});
Let’s get started with some advanced usage patterns for taking an element’s screenshot with Playwright, but in a customized way where we can control the contents of the screenshot.
Using Playwright’s addScriptTag to modify the DOM before taking the screenshot
Playwright provides a way to inject JavaScript code into the page before taking the screenshot.
Whether you want to modify the DOM, or just add some CSS to the page, you can do so using the addScriptTag API.
The API is documented here and provides
the ability to both specify a path to a JavaScript file, or to specify the JavaScript code inline.
Specifying the contents of the JavaScript code is going to be a handy way to hack this example in order to DOM before taking the screenshot.
Let’s build on the above example to take a screenshot of the Popularity section, but this time, we’ll
be injecting a JavaScript code that will hide the three paragraphs that we don’t want to capture:
import { test, expect } from '@playwright/test';
test('take screenshot of element', async ({ page }) => {
await page.goto('https://snyk.io/advisor/npm-package/playwright');
// run some sanity to make sure we're capturing the right page
await expect(page).toHaveTitle(/playwright/ig);
const element = await page.locator('#popularity');
const scriptJsContent = `
document.querySelector('#popularity p').style.visibility="hidden";
`;
await page.addScriptTag({ content: scriptJsContent });
await element.screenshot({ path: 'package-popularity.png' });
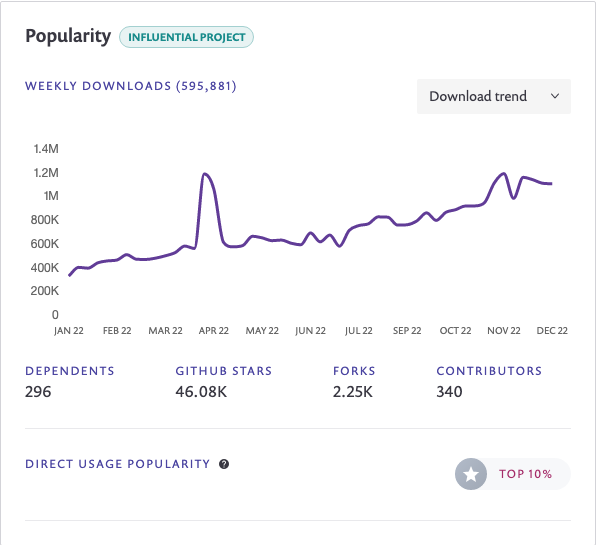
});This will generate the following screenshot file:
As you can see, only the first paragraph is hidden, which is because
we’ve had used querySelector to select the first paragraph, and not
all matching elements in the DOM.
Let’s fix this by using querySelectorAll instead:
import { test, expect } from '@playwright/test';
test('take screenshot of element', async ({ page }) => {
await page.goto('https://snyk.io/advisor/npm-package/playwright');
await expect(page).toHaveTitle(/playwright/ig);
const element = await page.locator('#popularity');
const scriptJsContent = `
document.querySelectorAll('#popularity p').forEach(elem => elem.style.visibility="hidden");
`;
await page.addScriptTag({ content: scriptJsContent });
await element.screenshot({ path: 'package-popularity.png' });
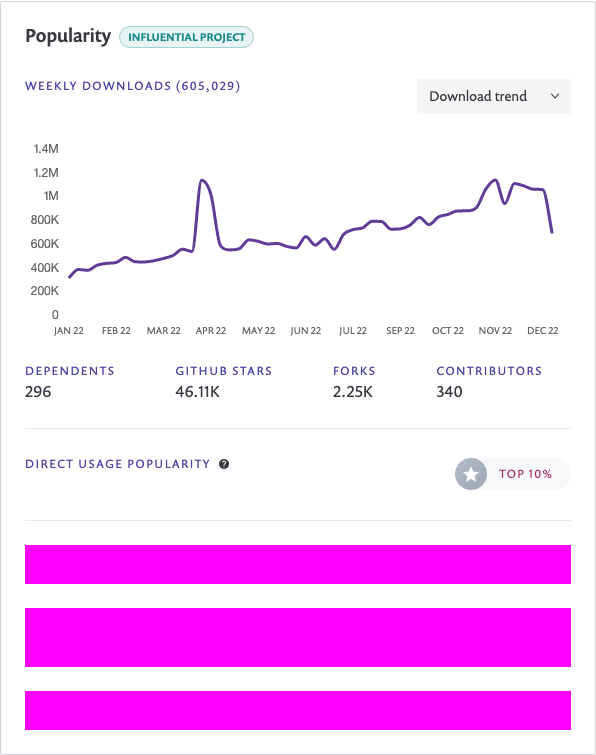
});This is great because now we’ve hidden all the paragraphs, but I’m sure you’re thinking the same as I am: what’s with all that blank space in that div? Let’s fix that too.
Instead of hiding the paragraphs, let’s remove them entirely from the DOM so they don’t occupy any space:
import { test, expect } from '@playwright/test';

test('take screenshot of element', async ({ page }) => {

  await page.goto('https://snyk.io/advisor/npm-package/playwright');

  await expect(page).toHaveTitle(/playwright/ig);

  const element = await page.locator('#popularity');

  const scriptJsContent = `
    document.querySelectorAll('#popularity p').forEach(elem => elem.remove());
  `;

  await page.addScriptTag({ content: scriptJsContent });

  await element.screenshot({ path: 'package-popularity.png' });
});
Let’s look at the generated screenshot now with the above changes:
Using the Sharp npm module to modify the screenshot image
What is Sharp?
Sharp is a high performance Node.js module for resizing, cropping, and manipulating images. It uses the libvips library for image processing, which is a fast image processing library with low memory needs.
What if we didn’t have the ability to use Playwright’s APIs to modify the DOM before taking the screenshot? What if we only had the screenshot image file?
One way to solve this problem is to modify the image file in a way that
crops the image to the desired size, and removes the unwanted content.
Luckily, the way the page is built, the Popularity section maintains
a consistent layout proportions across different package pages, so we
can use the same cropping logic for all package pages.
To use Sharp, we need to install it as a dependency:
npm install --save-dev --ignore-scripts=false --foreground-scripts sharpNote: if you’re wondering about the --ignore-scripts=false and --foreground-scripts flags,
it’s because Sharp uses a pre-built binary for the libvips library, and the pre-built binary
is only available for Linux, macOS, and Windows.
Then we can create the following Node.js program code to use Sharp and apply our image cropping logic on to the screenshot image:
const sharp = require("sharp");

const FILE_NAME = "package-popularity.png";

async function main() {
  const image = await sharp(FILE_NAME);
  const imageMetadata = await image.metadata();

  image
    .extract({ left: 0, top: 0, width: imageMetadata.width, height: 525 })
    .toFile("package-popularity-cropped.png");
}

main();
Using Playwright mask to hide content
A hidden gem with Playwright’s API is the mask option that takes in
any number of page elements and will hide them with a painted full
rectangle, a mask.
Here’s how to use Playwright’s mask API:
await element.screenshot({ path: 'figure1-1.png', mask: [page.locator('#popularity p')]});
The above code uses the screenshot method of the element object to take a screenshot of the element
and save it to a file called figure1-1.png. The mask option is used to specify a CSS selector
for an element on the page to be excluded from the screenshot. In our case, the element with
the CSS selector #popularity p will be excluded from the screenshot and it will select all of the
matched p elements on the page. We have three of them, so that works quite well for us in the
case of Snyk Advisor’s popularity section.
Playwright masking result looks as follows:
Summary
Good job! You’ve now learned how to take a screenshot of a specific element on a page, how to modify the DOM before taking the screenshot, and how to use Sharp to modify the images with a server-side Node.js runtime.
